Runner Vision
Runner Vision, or Language of Interaction as the editor prefers to call it (LOI from now on), is the effect that causes objects to change color when you approach them. This tutorial will teach you how to tweak the existing effect, and how to create a material required for it from "scratch".
How to enable it:

LOI Settings
Let's start with how to enable LOI. It's pretty much as easy as it gets. Simply place an object that has a material that is LOI compatible, select it, enter its properties window by hitting F4, expand the 'Interaction' tab and tick 'bLOIObject', and it's done. You might want to tweak the effect a little, so here's the description of the other parameters in this tab.
'bInteractable': Unrelated to LOI, this is for breakable glass and doors.
'bLOIObject': This turns on and off LOI effect for the object.
'LOIAngle': If it's non-zero, the area where LOI will trigger will be a "cone" instead of sphere. The value decides the angle at the top of the "cone"
'LOIDirection': The 3 parameters control where the "cone" is facing.
'LOIDistance': This value controls the distance at which LOI will activate.
'LOIGroups': N/A. Feel free to edit the page if you know what it does.
'LOILookAtDelay': N/A. Feel free to edit the page if you know what it does.
'LOIMinDuration': The minimum time the LOI effect will last.
'LOIOffset': This parameter controls where the center of the effect is relative to the center of the object.
'LOIProximityDelay': The time after which the effect will activate after you are inside it's distance.
'LOIUse2DDistance': If checked, the game will ignore your Z coordinates when checking if you are inside it's distance, so no matter how high above you are from the object, the effect will start anyway.
You probably won't ever change anything other than 'bLOIObject' and 'LOIDistance' as those are two significant parameters really.
How to change color:

Material Instance properties
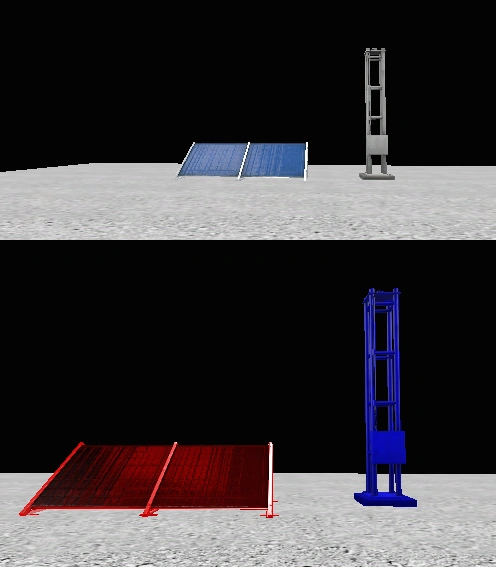
There are two similar ways to change the color, and both of them will most likely only work on custom maps. In this tutorial I will be using the zipline base and show you how to recolor it. The first is probably easier, and my preferred choice and the second will be basically covered in the how to create LOI material part anyway.
Open the generic browser and find the materials you need. If you don't know what you are looking for the material usually has a similar name to the object but if it doesn't, right click on the static mesh, and click on 'Show Referenced Assets'. This will bring up lots of (mostly uninteresting) results, but some of the materials are what you are looking for are also listed. In my case the mesh is 'S_ZipLineBase_01' and the material is 'M_ZipLineBase_01' and both of them are in 'Props/P_RunnerObjects.upk'. Now right click on the material and choose 'Copy Reference' (or press Ctrl+C). Since I don't think manipulating the original packages is a particularly smart idea (see packages tutorial later), we will need to use another package. Unless you have a package dedicated for your maps, we can use the map itself as the package. If you check out the list of available packages on the left you will see one matching the map's name. So open that up. Right click into the empty space and choose 'New MaterialInstanceConstant'. Now open this new MIC by double clicking on it. From the list of parameters find the one called 'Parent', and paste the reference from the original material by pressing Ctrl+V. Now if you did it correctly, the displayed object on the right changed it's texture. After that go down to the bottom of the list, expand 'VectorParameterValues', tick the one called LOI_Color and change the color. Now the only thing left to to is to apply this material to the object you want, and make sure LOI is enabled on it.
How to create LOI material:

New material
So unfortunately a lot of objects don't have LOI compatible materials including all of your own textures, but it isn't hard to change that. This tutorial will show how to do it on an original material, which is probably more tedious than to do on a custom one. So let's say you want LOI on the solar panels for whatever reason. By default they don't have it. The static mesh is called 'S_SolarPanel_01' and the material it uses is called 'M_SolarPanel_01' and both of them ared in 'Props/P_Rooftops.upk'.
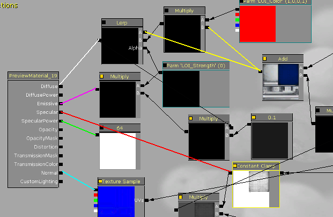
Open the material by double clicking on it. This will bring up the material editor. Now hold down Ctrl and start clicking on the boxes with preview images. When you've selected all of them (you can check this by dragging them while still holding down Ctrl) press Ctrl+C, which will copy them. Again, we need our own package to create the new material, so for simplicity's sake let's create it into the one that has the same name as our map. Right click into the empty space and choose 'New Material'. Double click on this new material to open up the material editor, and then press Ctrl+V. This will paste all the boxes from the Solar Panel. Now we have connect the preview boxes into the big one, based on how it was done in the original one. When you are done copy the settings of the big box also based on how it's done in the original.


Copy these boxes
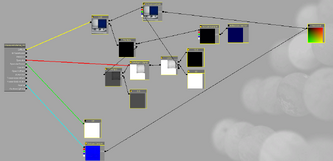
Now we have the perfect copy of the original material (we can't use Duplicate in the original packages as they are protected). The next step is to copy the LOI part from a material that has it. So open up 'Props/P_RunnerObjects.upk' and open 'M_ZipLineBase_01'. You will see that there's a boxed area named LOI. This is the part we will be copying the same way as we did before. All materials with LOI seem to have to have the same emissive setup as well, so you probably want to copy the 3 boxes a bit left under the LOI box too. When you are done copy them all into your new material. Now it might be that they overlap each other a bit, if so drag the boxes around a bit. Finally, we need to reconnect the boxes. The idea is to whatever goes to diffuse goes into the empty LOI connectors, and the final product will be linked to diffuse (same goes for emissive, but that also uses that 3 boxes jut outside the LOI box), but the image shows it much better. Now apply the material to the objects you want, and you will see that they have the LOI effect too!

The final connections